Best Practices For Tracking AMP In Google Analytics
Welcome back. I know it’s been a while. The more eagle-eyed amongst you may have noticed that my site is no longer on Grav. Grav was nice, but the maintenance overhead for it was too high for me as someone with next to no Twig skills.
Consequently, I’ve gone back to WordPress, the Genesis Framework and an nginx server with DigitalOcean (aff). Pretty fast, right? But in my quest to make my site even faster, I did something else which inspired today’s post: I’ve put it on AMP for mobile.
I actually quite like it, some design challenges aside. But one of the things I’ve noticed with it on this site and clients that have gone to AMP is that it can cause some tracking issues with Google Analytics. In today’s post, I’m going to show you a few different ways that you can resolve them, creating a unified view, being able to compare them in your Master View and creating an AMP-specific view with the relevant filters and segments.
What Is AMP?
AMP – short for Accelerated Mobile Pages (so please don’t call them AMP pages!) – is a project by Google to create a faster experience for mobile users. The pages are pretty stripped down, with limited styling and no JavaScript in place, but they load almost instantly.
Google likes AMP from an SEO perspective, but there are naturally some concerns about it:
You’re putting your site on Google’s content delivery network. This means Google gets even more control of the web. Some would argue that Google already has too much control of the web and that AMP is another way to wrest that control from content creators and owners. It’s also pretty limited in terms of design and functionality
That said, it’s crazy fast and I see more and more people leveraging it, so it’s worth writing today’s post to help you track it properly.
Why You Need To Track AMP Differently
AMP creates duplicates of your pages for the platform. Don’t worry – if you’ve implemented it properly, the canonical tags will manage that duplication, but you will have different URLs for your AMP section, which will mean you’ll have duplicates in your Google Analytics.
You’ll want to see how your pages and posts are performing across the two different versions of your site, but from a best practice perspective, you also need to be able to see total performance at a glance so you can make decisions about your pages.
Here’s how I recommend setting it up.
Best Practice For Google Analytics Views
Last year, I did a speaking session on Google Analytics Best Practices. It was very much an introductory session and I enjoyed it a lot. As it was an introductory session, AMP wasn’t discussed, but I think the presentation stands up in terms of how you should set up your Google Analytics with some key additions if you’re using it.
You can see the slides below.
Following these best practices, how do you update for AMP?
Best Practices For AMP Tracking
To fully understand the performance of your content or products – particularly over time – you need to be able to compare your URLs in your Master View and get an overview of how everything is working, but you also need to be able to isolate both versions of your content, especially if something isn’t working the way you’d hope.
There are a number of ways that you can do this and it largely comes down to personal preference and how you want to analyse your page performance. Over the next few sections, I’m going to cover the different methods I use:
- A filter to unify your AMP and non-AMP URLs
- A content grouping to let you isolate AMP and non-AMP URLs
- A segment for AMP and non-AMP content
- An AMP-Specific View
There are advantages and disadvantages to each, which I’ll cover shortly.
Unifying AMP And Non-AMP Content With Filters
If you want to have the ability to see your overall content performance, unifying your AMP and non-AMP URLs so you can really see the impact of the implementation, you can use a filter to rewrite the /amp from the page and just see the core path.
The advantage here is that you can see the overall performance of your pages without having to add up the numbers from AMP and non-AMP. The disadvantage is that you can’t directly break the two out, although you can use a secondary dimension or segment to see mobile and desktop traffic, which will help. That said, it can still get a little messy with mobile users who tap the “Non-AMP version” button.
Personally, I’m a fan of having a unified view, a separate view purely for AMP traffic and a content grouping within the Master View so I can really dig into it, but it really depends on your traffic and the way you report and analyse your performance.
Assuming your AMP URLs contain /amp, the following filter will let you rewrite those URLs in your unified Google Analytics view. You may need to change it depending on your implementation. If you’re not sure how to do that, drop me a line through the contact form or on Twitter and I’ll see if I can help.
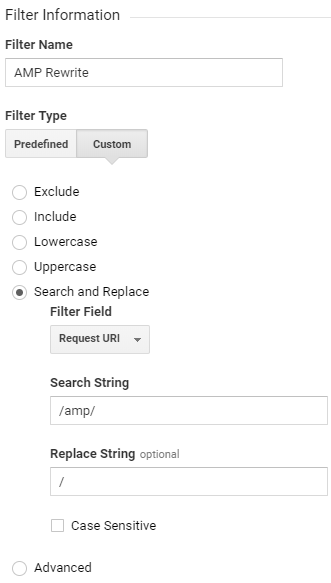
This filter will rewrite any URL containing /amp to the previous point, meaning that any URL ending in /amp will be the same as one not containing it. Consequently, your view gets to continue reporting on the performance of every page on your site, whether it’s AMP or not, enabling you to understand the overall performance of your content.
To reiterate: I do not recommend doing this in your Master View. That view should have as much relevant data as possible. Create a separate view for this unified traffic.
Google Analytics Content Groupings For AMP
Content groupings are, in my opinion, one of the most underused features of Google Analytics, so what better time to get familiar with them than as part of an AMP implementation?
These two content groupings will let you isolate your AMP and non-AMP URLs, allowing you to compare the two. I’d argue that this is the best option for reporting from your Master View, since it doesn’t end up with the messy data that you can have with the unified filter and secondary dimensions and it also doesn’t trigger sampling earlier the way segments can.
Note: Content groupings are not retroactive, so you really need to get these ready at the same time you do your implementation.
Here’s how to create your AMP content grouping:
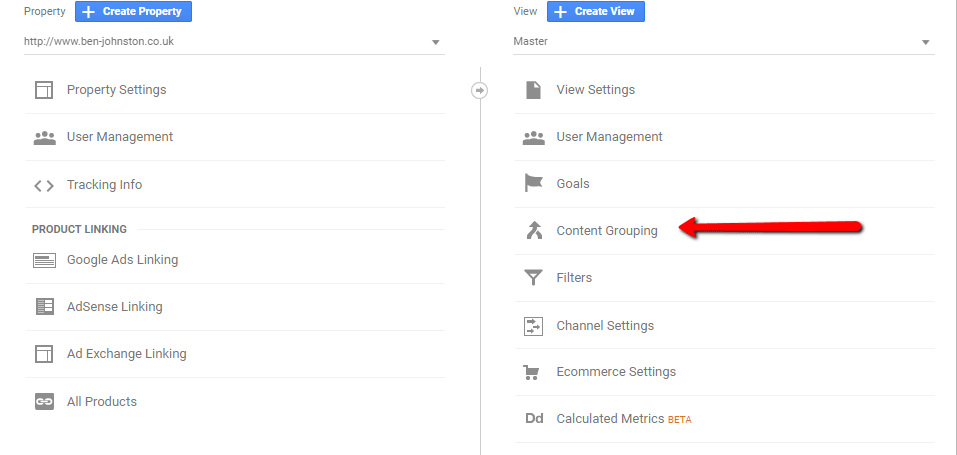
Within the Content Grouping section of your Google Analytics view, you’ll want to use the following settings to create your AMP grouping:
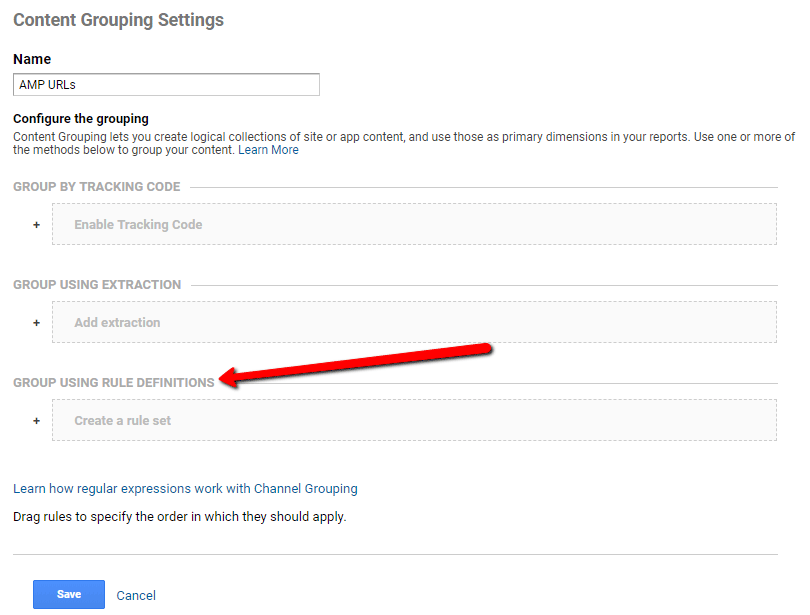
Now that we’re ready to create our group with Rule Definitions, this is the rule that you need to use to create your AMP content group.

Here’s how to create your non-AMP content group.

And here’s how you can view your new content groupings in Google Analytics:

From here, you can see the performance of all your traffic, but also compare the two different versions.
Creating Segments For AMP And Non-AMP Traffic
As great as content groupings and filters are, nothing beats a segment for a quick overview.
Even though we’ve created our unified view and our AMP and non-AMP content groupings in our Master View, it’s worth adding a couple of custom segments so we can have a really quick look at how things are working in Google Analytics.
Although I don’t recommend using these segments for reporting purposes due to sampling and general accuracy, they’re well worth setting up for quick performance checks if you’ve implemented AMP. Here’s how to set them up:

To create your AMP-specific segment, follow the instructions below:
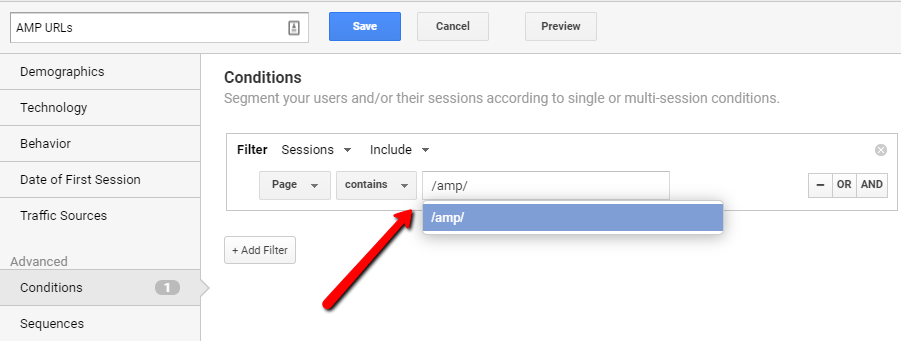
And for your non-AMP segment, you’ll need to use the following settings. Again, adapt depending on your installation.
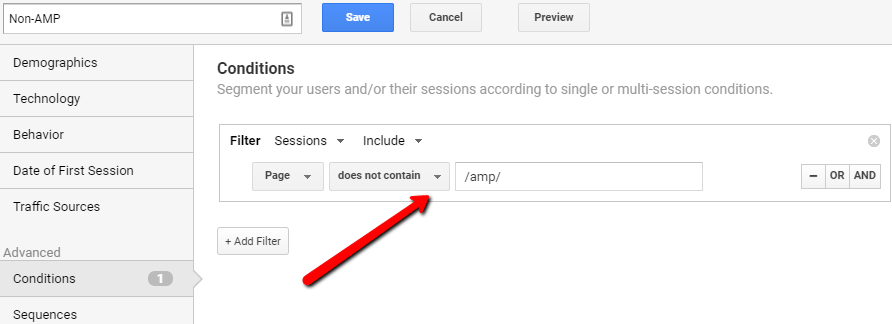
If you’d like a little more info about filters and segments, you can see my post about Segments Vs Filters in Google Analytics on my work site.
Creating An AMP View
Now we want to add a view to our Google Analytics account that lets us extract just our AMP traffic, so we can analyse that separately. The filter below will let you create a view which only includes URLs containing /amp. Adapt accordingly if your implementation is different.
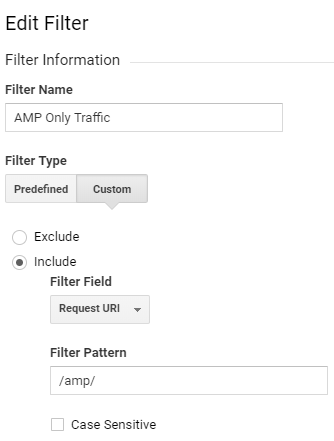
And there you go, a separate view for your AMP site. If your people are on a static IP with their phones, such as the office WiFi, feel free to exclude that to keep your view clean. Maybe I’ll do a separate Google Tag Manager for AMP post in the future.
The Final AMP Google Analytics Setup
Some of these recommendations don’t follow how Google says you should do things, but in my experience, this is the best way to isolate, analyse and compare your AMP and non-AMP performance.
To sum things up, here’s what I would say is the best way to set up your Google Analytics following a migration to AMP:
- A unified view: A Google Analytics view that lets you see overall performance of your pages at a glance, making no distinction between AMP and non-AMP content.
- AMP and non-AMP content groupings in your Master View: By using content groupings, you’re able to compare the performance of the two different platforms in your main reporting view.
- AMP and non-AMP segments: These will let you compare the performance of the two at a glance, but should only be used for a quick look rather than for in-depth analysis due to accuracy.
- A separate AMP view: A view only for your AMP traffic, which you can set up to track your key goals accordingly, especially if your mobile goals differ from your main site goals.
And there we have it; my recommendations for tracking AMP in Google Analytics. How are you tracking your AMP traffic? Message me through the contact form or Tweet me and don’t forget to sign up for my email list. I’ve got a really big post coming up in the next few weeks that you won’t want to miss.
Until next time.

